


Imagine you’re starting a new project with a client and need to get lots of things done quickly — like collecting their information, organizing important documents, creating task lists for your team, and sending welcome messages. Doing this manually can take a lot of time and sometimes important steps get missed.
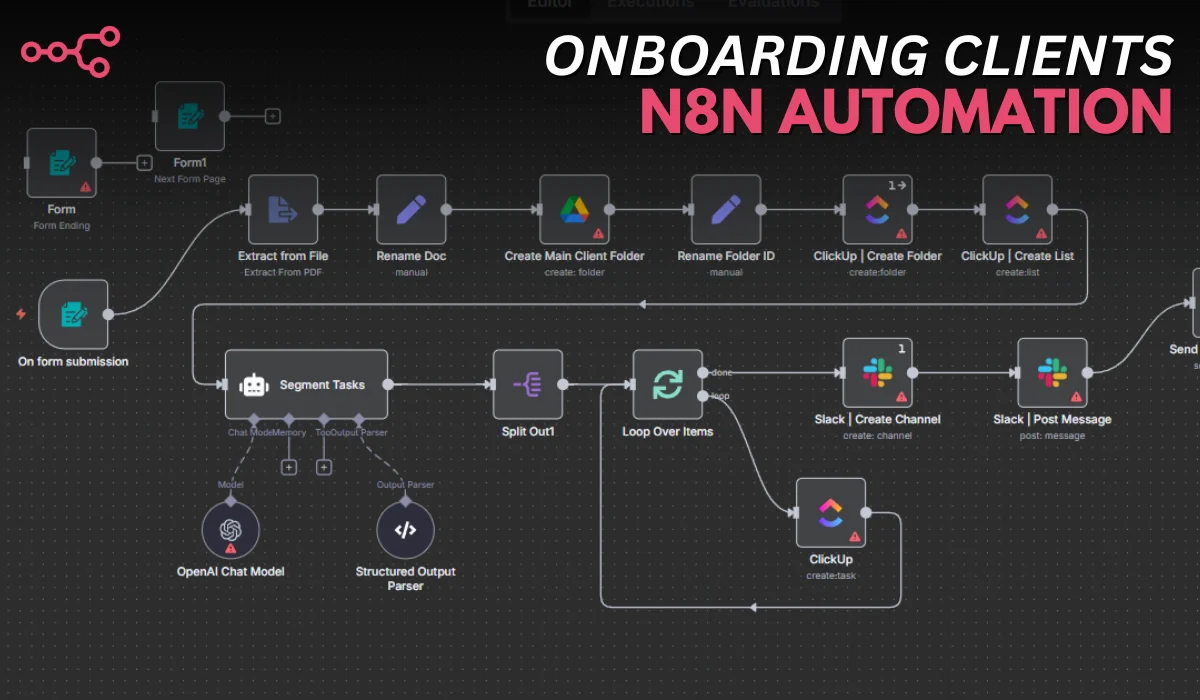
This workflow is a simple, automated system built using a tool called n8n that helps you finish all these tasks fast and in the right order. Once set up, it can onboard new clients in about 30 seconds! That means it takes care of gathering client details, organizing files, creating step-by-step tasks for your team, setting up a chat group, and even sending a friendly welcome email — all automatically.
What Does This Workflow Do?
When you get new client details using a form, this workflow:
- Creates a folder just for the client in Google Drive to keep documents organized.
- Sets up a project folder and checklist in a task manager called ClickUp, breaking the onboarding into clear steps.
- Sends useful messages to your team through Slack by opening a chat channel for the client.
- Sends a welcome email to your client with all the important links and next steps.
Everything happens with little to no manual work after you press “start.”
Step-by-Step n8n Workflow Automation for Client Onboarding
Step 1: Log into n8n
- Access your n8n instance and create a new workflow.
Step 2: Add the Form Submission Node

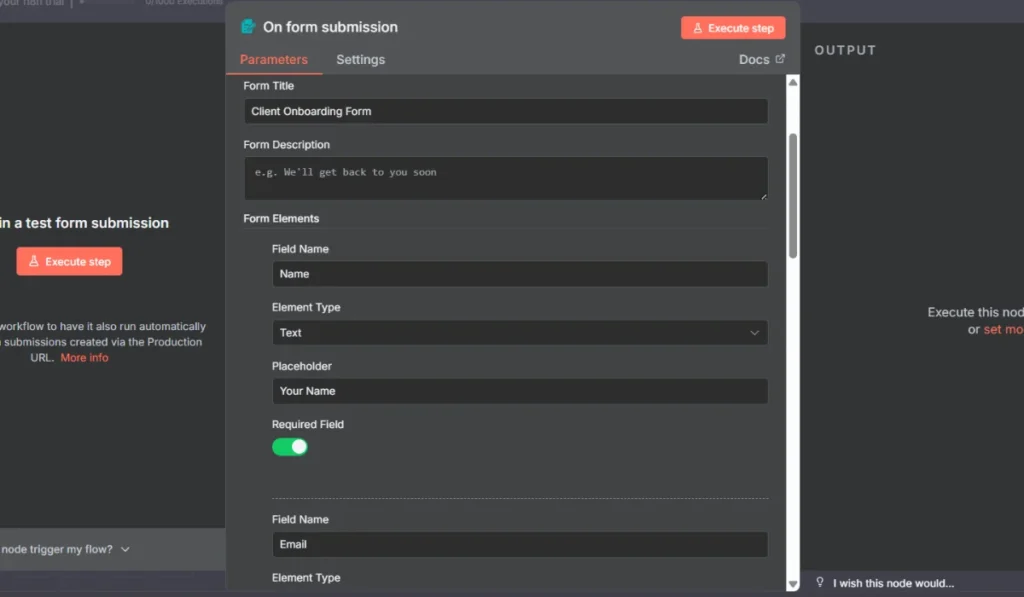
- Insert a “Form Trigger” node.
- Configure the form with these required fields:
- Name (your client’s name)
- Email (your client’s contact)
- Company Name
- Website
- Proposal/Scope Document (file upload)
Step 3: Extract Data from Proposal/Scope Document
- Add an “Extract from File” node.
- Connect it to the Form Trigger node.
- Extract and parse key project information from the uploaded document for downstream nodes.
Step 4: Rename Uploaded Document (Optional for Organization)
- Add a “Set” or “Rename” node.
- Rename the proposal/scope document to “Project Information” for clarity and tracking.
Step 5: Create a Google Drive Client Folder
- Add a Google Drive node (resource: folder, operation: create).
- Use the company name from the form to create a unique folder path, e.g., “Acme Corp Client Folder”.
- Map the Google Drive credentials and permissions.
Step 6: Store Folder ID for Workflow Context
- Add a “Set” node.
- Store the newly created Google Drive folder ID for use in later steps when sharing files or links.
Step 7: Create a ClickUp Project Folder
- Add a ClickUp node (resource: folder).
- Configure it to create a new folder in ClickUp, using the client company name.
- Ensure the correct team, space, and ClickUp credentials are used.
Step 8: Create a ClickUp Onboarding List
- Add another ClickUp node (resource: list, operation: create).
- Place this list inside the previously created client folder.
- Name it, for example, “Acme Corp – Onboarding” or similar.
Step 9: Use AI (OpenAI Node) to Segment Onboarding Tasks
- Add an OpenAI node.
- Send the extracted project information as input, with instructions to parse and output 20–30 granular onboarding steps (task title, description, and due date).
- Ensure due dates are formatted as MM/DD/YYYY and calculated in US Central time.
- Use predefined rules for durations; default is 2 days unless specified.
Step 10: Parse AI Output into Structured Tasks
- Add an Output Parser node.
- Structure the OpenAI output for use in ClickUp task creation; split into individual tasks.
Step 11: Loop Over and Create Tasks in ClickUp
- Use a “Loop Over Items” or batch node.
- For each parsed task, create it in the ClickUp list.
- Assign appropriate priority, due dates, and optionally the assignee from your team.
Step 12: Create a Slack Channel for Client Communication
- Add a Slack node.
- Use company name (lowercase with underscores) to generate a channel name like acme_corp_channel.
- Map Slack OAuth credentials.
Step 13: Post a Welcome Message in Slack
- Add another Slack node, connected to the newly created channel.
- Send a personalized, welcoming project kick-off message.
- Include the client’s name and main project points.
Step 14: Send a Customized Welcome Email via Gmail
- Add a Gmail node.
- Configure:
- “To”: client’s email
- Subject: “[Client Name] – Your Onboarding is Complete!”
- Body: Welcome message, project workspace details, how to access Google Drive, link to onboarding call scheduler, next-step instructions.
Download n8n Automation: Click Here
How Can You Use This Workflow?
This system is perfect for any online service or project-based business that wants to save time and avoid mistakes during client onboarding. It takes the hassle out of managing many small but important tasks.
You can download the complete workflow template [here]. It’s easy to import into your n8n and start personalizing it for your needs.
Once set up, every new client’s info will flow through this system smoothly, so you and your team can focus more on the work that matters.
Final Tips
- Keep your client form clear and simple to avoid confusion.
- Make sure your Google Drive, ClickUp, Slack, and Gmail accounts are connected securely to n8n.
- Feel free to customize the tasks and messages to fit your own onboarding style.
This automation helps make client onboarding fast, smooth, and professional. Anyone on your team—even someone new—can understand and use it with ease.
If you have any questions about setting this up or want help customizing it further, just comment below!
FAQs
What is client onboarding automation?
Client onboarding automation is the use of a system that automatically handles the steps needed to welcome and start working with a new client, saving time and avoiding mistakes.
Do I need technical skills to use this n8n workflow?
No, the workflow is designed to be simple and mostly drag-and-drop. Basic understanding of connecting apps and filling form fields is enough.
What tools does this workflow connect?
It connects Google Drive, ClickUp, Slack, and Gmail to organize files, create tasks, communicate internally, and send emails automatically.
Can I customize the onboarding tasks in this workflow?
Yes, you can edit or add tasks based on your specific onboarding needs within the system.
Is this workflow suitable for all types of online service businesses?
Yes, it works well for any online service or project-based business that wants fast and organized client onboarding.
Where can I download the workflow template?
You can download the complete n8n workflow template file from the link provided in the article to import and use immediately.